During the first pandemic of the third millenium I joined the sourdough baking bandwagon as well. In the contrary of other blog posts, especially at r/Sourdough or r/Breadit, I am not going to post my first sourdough bread, instead I am going to post the last one a sort of mic 🎤 drop. I would like to record in this entry my process of baking sourdough bread and in the end I am going to explain the reason I am stopping.
I will save you dear reader the details of making your own sourdough starter, there are lots of guides for that1. Mine is called Akiba (as the chess GM) and I have been feeding him once per week for almost one year now and there have been even times that I have abused it by leaving for two weeks straight in the fridge.
My schedule of baking start on Friday night around 8 pm. I keep only 20-25 grams of starter in order to have a feeding ratio of 1:4:4 (1 part starter, 4 parts water, 4 parts flour). I take the starter jar out from the fridge and add 80 grams of cold tap water and 80 grams of flour in total. I usually do not use 100% strong white flour for feeding, but mix it with also all purpose flour in a ration of 60%-40% strong-all purpose flour. I mix the starter and the additions quite well in a jar of volume of around 600 ml (it has happened only once actually that starter did overflow). Now my learning in this journey is that the temperature plays the crucial role in order to have reproducible results. My apartment is usually around 21-23° Celsius throughout the year, this allows the starter to more or less reach the peak in 12 hours.
The next day in the morning the Akiba is ready to blow another one. You can tell that it has doubled in size and the smell is not too sour but sort of banana smell tending to sweet. I have two big Ikea steel bowls Blanda Blank 28cm to prepare the bread mix. In one I pour 630 ml of cold tap water and 160 gr of starter. I stir the starter with a spoon very well until it is completely dissolved and the water becomes like milk. In the next bowl I mix 700gr of strong whote flour with a protein content of 13.5gr with 150 gr of wholemeal flour (or rye flour although this one is a little bit trickier to work with as it sticks). In this way the amount of wholemeal is around 17.5% of all the flour weight and the hydration of the dough is 76.5%2. I add 19 gr of salt - yes 19, never exceed that - which is approximately one tablespoon that I do not weight when I am feeling lucky. I mix with my hand the dry flour with the salt and then pour the flour/salt mixture in the water where I dissolved the starter 3. I start mixing with the same spoon as before until no dry flour is remaining. I cover the bowl with cling film and let it rest. The flour bowl can be just rinsed and no need for wash.
The stretch & fold phase begins after 1 hour. I wet my right hand and with my left hand hold the bowl while with my right one do a set of stretch and folds (it is very important that you have one hand free and clean). This technique consists in basically stretching the dough in one direction, folding it over and then rotating the bowl 90° and repeating the process until all four directions are stretched and folded. I cover back with the same cling film (which I reuse every week until it rips apart). I repeat this process in total 3 times spaced by 1 hour each. By lunch time I have completed this phase. First and second stretch & fold time the dough is quite sticky but no worries about it sticking with the hand there will be some losses.
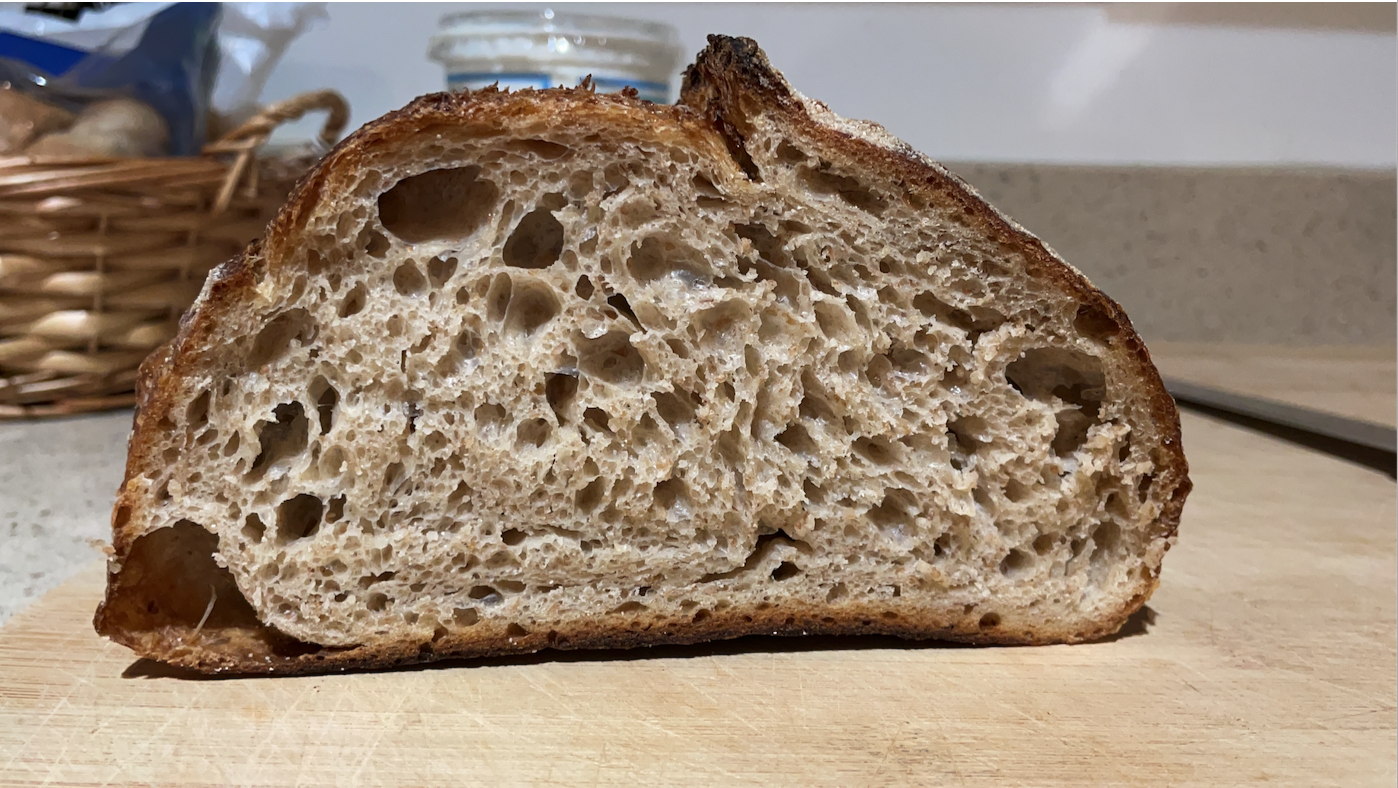
The next phase is the easiest: bulk ferment meaning the whole dough is fermenting in the same container. This phase is important for the taste and and texture of the bread. If you wait to have a double in size your dough will not probably have a great oven spring but will taste sourer and the crumb will be a little stickier. If the bulk ferment is stopped between 25 and 50 percent rise the oven spring is higher. Watch this awesome video from Foodgeek for this research. I prefer around 50% as my sweet spot on the balance between taste and crumb texture. In my usual room temperature this process finishes around 8 pm. Since I use a bowl is quite difficult to mark the 50% rise but I know more or less the texture the dough should have and the fact that when I slightly shake the bowl it wobbles.
This phase consists in taking out the dough from the bowl with a scraper and dividing it into two equal-ish parts again with the scraper. Each dough part I pre-shape it in a ball by folding each of the 4 sides on top. After I flip over, with the bench scraper put below, I pull the dough ball toward myself to create some surface tension. The dough is usually not sticky at this point. I let them rest for around 30 minutes uncovered. Afterwards I start shaping both rounds for a batard 4:
I put each shaped dough in floured batards and place them inside a plastic bag which I reuse (I have been reusing them for the last 6 months). I place the batards in the fridge for another overnight proofing. Starting from next morning Akiba’s work is ready to be baked.
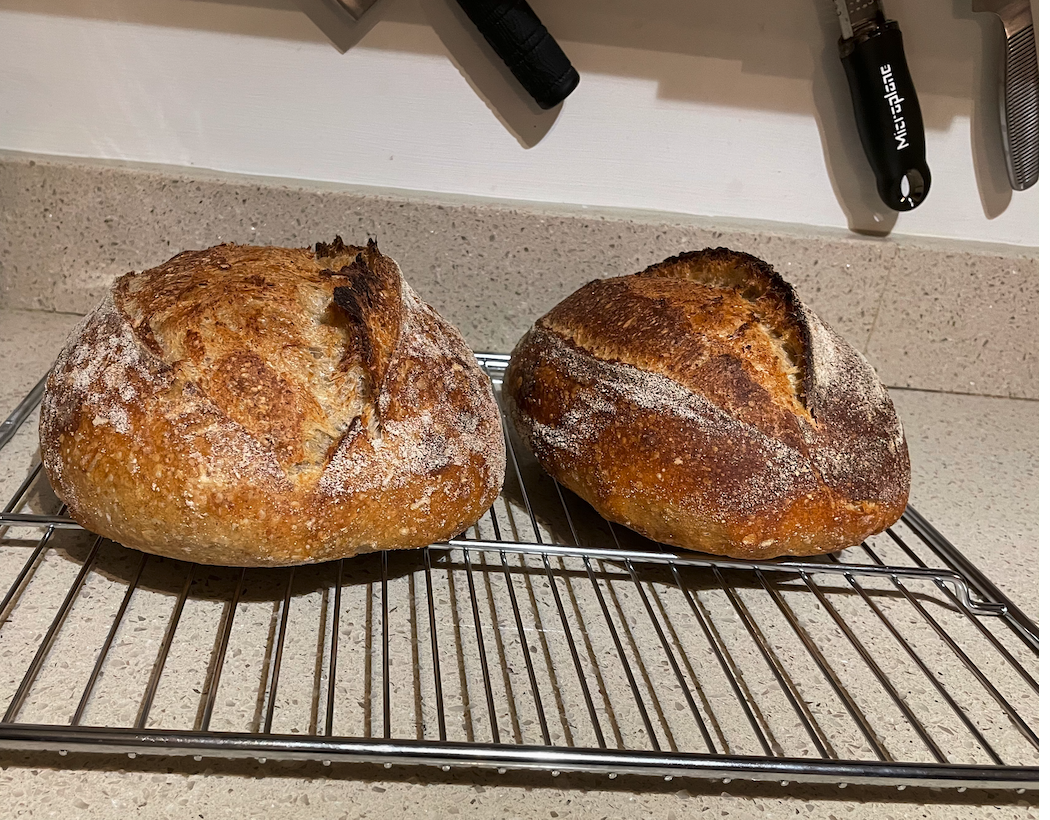
I do not have a Dutch oven, but I have an oven stone and a big cast Aluminium Roasting pan with a lid. I place the oven stone under the pan to pre-heat for around 20 minutes at 260° Celsius. I take the first batard and flip it in parchment paper folded to have two layers. I score it with a hobby knife that I keep very sharp and place it inside the pan. I bake it at 260° Celsius for 25 minutes with the lid, then remove the lid lower the temperature to 210° Celsius and bake for another 20 minutes. I take out the baked bread and place it in an oven rack to cool down. After the oven is heated again at 260° Celsius I continue with the next batard in the same way. The results are amazing:
So why did I stop baking sourdough? December 2020 I did a blood test because of frequent headaches, but no other complaints. I used to run and do some hikes occasionally but had no issue whatsoever. Blood tests showed very low iron levels in my blood. I was told that the such low iron levels might be explained either by a low intake or a “leak” in the system, both options quite scary if you exclude the fact I used to eat red meat regularly. The most common cause after diet, was malabsorption of iron from coeliac disease. I didn’t want to believe as I was in my mid thirties and had no issue whatsoever by eating gluten in my entire life. After 1 month of basically minor improvements in iron levels despite my higher intake, I did the antibody test for tTG levels: they were higher than the scale of the blood test, leaving practically no doubt for it. Gastroendoscopy and biopsy confirmed this one month later. And here I am with a gluten free diet for life. I have been baking the remainder of my white bread flour for the rest of my family, but I am going to stop once I finish it quite soon. I now need find a new owner for Akiba.
Sourdough starter video https://www.youtube.com/watch?v=2FVfJTGpXnU ↩︎
The math of hydration: 80gr of water in the starter + 630gr added later = 710gr total water. 80gr of flour in the starter + 850 gr in the bowl = 930 gr of total flour leading to 76.3% ratio of water to flour. ↩︎
There are other techniques that involve autolysing the flour with the water and then adding salt and starter after some rest hours, but it is tricky to mix the starter with the dough at that points and if you are not an expert like me, you are probably going to overwork it and destroy some of the gluten network created during autolysis. ↩︎
Adapted from https://www.theperfectloaf.com/guides/shaping-a-batard/ ↩︎